(2) Composition and layout of CNC lathes
1. The composition and characteristics of CNC lathe

Figure 3-1 shows a full-function CNC lathe, which is generally composed of the following parts:
(1) Mainframe It is the mechanical component of the CNC lathe, including the bed, the spindle head, the tool holder tailstock, and the feed mechanism.
(2) Numerical control device It is the control core of CNC lathe, and its main body is a computer with CNC system running (including CPU, memory, CRT, etc.)
(3) Servo drive system It is the power part of the CNC lathe cutting work, mainly realizes the main motion and the feed motion, and is composed of the servo drive circuit and the servo drive device. The servo drive unit mainly includes a spindle motor and a feed servo drive (stepper motor or AC/DC servo motor, etc.).
(4) Auxiliary device Auxiliary device is some matching components of the index control lathe, including hydraulic, pneumatic and cooling systems, lubrication system and chip removal device.
2. The layout of CNC lathes The layout of CNC lathes is basically the same as that of ordinary lathes. However, the layout of tool holders and guide rails of CNC lathes has changed greatly, which directly affects the performance of CNC lathes and the structure and appearance of machine tools. In addition, CNC lathes are equipped with closed guards.
(1) Layout of the bed and the guide rail The relative position of the horizontal plane of the guide rail of the CNC lathe is shown in Figure 3-2.
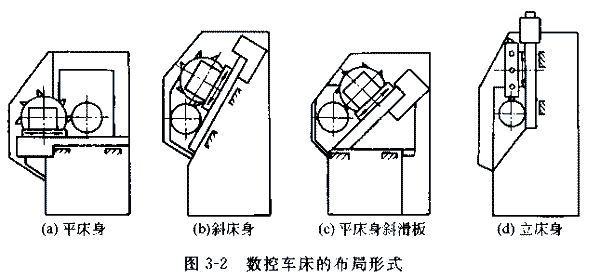
1 As shown in Figure 3-2 (a), the layout of the flat bed is good in craftsmanship and facilitates the processing of the guide surface. The horizontal bed is equipped with a horizontally placed tool holder to improve the accuracy of the tool holder. This layout can generally be used on large CNC lathes or small precision CNC lathes. However, due to the small space in the horizontal bed, it is difficult to remove the chips. From the structural size, the horizontal placement of the tool holder makes the horizontal length of the slide plate longer, thereby increasing the structural size in the width direction of the machine tool.
2 As shown in Figure 3-2(b), the slant bed is laid out at an angle of 30°, 45°, 60° and 75°. When the angle of inclination of the guide rail is 90°, it is called the vertical bed, as shown in Figure 3-2(d). The inclination angle is small, the chip removal is inconvenient; the inclination angle is large, and the guideability and the force of the guide rail are poor. The angle of the tilt angle also directly affects the ratio of the height and width of the machine's external dimensions. Considering the above factors, the tilt of the bed is preferably 60° for small and medium-sized CNC lathes.
3 As shown in Figure 3-2(c), the layout of the flat bed inclined skateboard has the characteristics of a horizontal bed with good craftsmanship on the one hand, and the machine width direction is smaller than the horizontal configuration skateboard. And the chip removal is convenient.
The layout of the inclined bed and the inclined bed is commonly used by medium and small CNC lathes. This is because the two layouts are easy to remove chips, hot chips do not accumulate on the guide rails, and it is easy to install the automatic chip conveyor; easy to operate, easy to install the robot to achieve single machine automation; the machine has a small footprint and beautiful appearance. Easy to achieve closed protection.
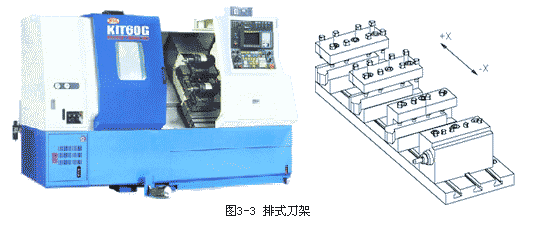
(2) The layout of the tool holder is divided into two types: row knife holder and rotary knife holder (see Figure 3-3, 3-4). At present, the two-coordinate linkage CNC lathe mostly uses a rotary tool holder, and its layout on the machine tool has two forms. One is a rotary tool holder for processing disc parts, the rotary axis of which is perpendicular to the main shaft; the other is a rotary tool holder for machining shaft and disc parts, the rotation axis of which is parallel to the main shaft.
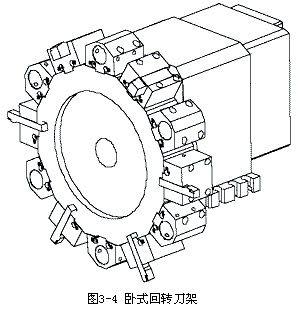
A four-axis controlled CNC lathe with two independent slides and a rotary tool holder, also known as a double-turret four-axis CNC lathe. The cutting feed amount of each tool holder is separately controlled, so the two tool holders can simultaneously cut different parts of the same workpiece, which not only expands the processing range, but also improves the processing efficiency, and is suitable for processing crankshafts, aircraft parts and the like. Complex, bulky parts.
(III) Classification of CNC Lathes With the continuous development of CNC lathe manufacturing technology, a variety of products and different specifications have emerged, and several different classification methods have emerged.
Second, the typical structure of the CNC lathe The following mainly introduces the typical structure of the full-function CNC lathe.
1. The main motion system CNC lathe main motion required speed can be adjusted within a certain range, there is enough driving power, the position of the spindle rotary axis is accurate and stable, and has sufficient rigidity and vibration resistance.
2. The feed transmission system CNC lathe feed drive system is a direct object for digitally controlling the X and Z coordinate axes. The final dimensional accuracy and contour accuracy of the workpiece are directly affected by the transmission accuracy, sensitivity and stability of the feed motion. For this reason, the feed drive system of the CNC lathe should pay full attention to reduce the friction, improve the transmission accuracy and rigidity, eliminate the transmission gap and reduce the inertia of the moving parts.
3. The tool holder of the automatic rotary tool holder CNC lathe is an important part of the machine tool, and its structure directly affects the cutting performance and working efficiency of the machine tool. Rotary heads on the rotary tool holder Each tool holder is used to install or support various tools for different purposes. Through the rotation, indexing and positioning of the rotary head, the automatic tool change of the machine tool is realized. The rotary tool holder has accurate indexing, reliable positioning, high repeat positioning accuracy, fast indexing speed and good clamping performance, which can ensure the high precision and high efficiency of the CNC lathe.
According to the position of the rotary axis of the rotary tool holder relative to the spindle of the machine tool, it can be divided into vertical and horizontal rotary tool holders.
(1) Vertical rotary tool holder The vertical rotary tool holder has a rotary axis perpendicular to the machine tool spindle, and has a square tool holder and a hexagonal tool holder. It is mostly used on economical CNC lathes.
(2) The rotary axis of the horizontal rotary tool holder horizontal rotary tool holder is parallel to the machine tool spindle (see Figure 3-3), and the tool can be installed radially and axially.
4. Machine tailstock Generally speaking, the movement of the tailstock body is realized by the slide. After the tailstock is moved, it is locked to the bed by a manually controlled hydraulic cylinder.
The second section of CNC turning machining process and tooling I. CNC machining process analysis (a) machining process division on CNC machine tools processing parts, the process can be more concentrated, one assembly should complete all processes as much as possible. Compared with ordinary machine tool processing, the machining process has its own characteristics. The common process division principles are as follows:
1. Principle of maintaining precision
2. The principle of improving production efficiency (2) Determination of processing route In CNC machining, the trajectory and direction of the tool (strictly speaking, the tool position) relative to the workpiece is called the machining route, that is, the tool starts from the movement of the tool point until The path through which the machining program ends, including the path of the cutting process and the non-cutting idle travel such as tool introduction and return. The determination of the machining route must first maintain the dimensional accuracy and surface quality of the machined parts, and secondly, the numerical calculation is simple, the path of the path is as short as possible, and the efficiency is high. The following is an example of the processing route commonly used when machining CNC lathe parts.
1. The analysis of the processing route of the car cone can be divided into two cases: the car cone and the car cone, and each case has two processing routes. Figure 3-5 shows the two processing routes of the car cone.
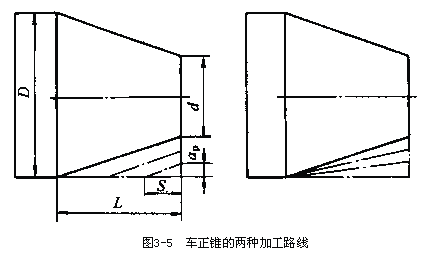
Figure 3-6 shows the two processing routes for the car's inverted cone.

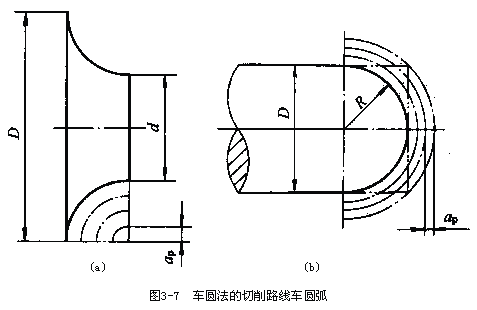
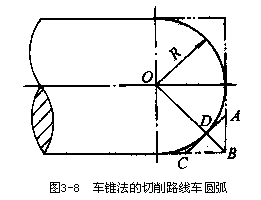
2. The processing curve of the car arc is applied to the G02 (or G03) command car arc. If a knife is used to machine the arc, the knife is too large and easy to be used. Therefore, in actual cutting, multi-knife machining is required, and most of the remaining amount is first cut off, and finally the required arc is obtained. The following describes the machining routes commonly used for car arcs, as shown in Figures 3-7 and 3-8.
3. When analyzing the axial feed distance of the thread, the feed of the tool in the thread direction should maintain a strict speed ratio relationship with the spindle rotation of the workpiece. Considering that the tool reaches the specified feedrate from the stop state or from the specified feedrate to zero, the drive system must have a transition process. The length of the machining route along the axial feed, in addition to the length of the machining thread, should also be Increase the tool lead-in distance of δ1 (2~5mm) and the tool cut-out distance of δ2 (1~2mm), as shown in Figure 3-9. In this way, when the thread is cut, it is ensured that the tool contacts the workpiece after the speed increase is completed, and the tool is decelerated after leaving the workpiece.

Second, CNC turning machining and tooling (a) the selection of fixtures, the determination of the workpiece clamping method
1. Clamp selection There are two main requirements for fixtures in CNC machining: first, the fixture should have sufficient accuracy and rigidity; second, the fixture should have a reliable positioning reference. When choosing a fixture, usually consider the following:
(1) Try to use adjustable fixtures, combination fixtures and other applicable fixtures to avoid using special fixtures to shorten production preparation time.
(2) In the batch production, special fixtures are considered and the structure is simple.
(3) It is quick and convenient to load and unload workpieces to reduce machine downtime.
(4) The fixture should be installed accurately and reliably on the machine tool to ensure that the workpiece is processed in the correct position.
2. Types of Fixtures There are two main types of fixtures on CNC lathes: one for discs or short shafts, and the workpiece blanks for clamping in adjustable chucks (three-jaw, four-jaw), driven by chucks Rotating; the other type is for shaft parts. The blank is placed between the top of the spindle and the tip of the tailstock. The workpiece is rotated by the toggle chuck on the spindle.
3. Installation of parts The installation method of CNC lathe parts is the same as that of ordinary lathes. It is necessary to select the positioning reference and clamping scheme reasonably. The main points are as follows:
(1) Strive to unify the benchmarks of design, process and offset calculation, which is conducive to improving the simplicity and accuracy of numerical calculation during programming.
(2) Minimize the number of clamping operations, and process all the surfaces to be processed after one clamping.
(II) Determination of cutting amount When programming numerically, the programmer must determine the cutting amount of each process and write it into the program in the form of instructions. The cutting amount includes the spindle speed, the amount of backfeed and the feed rate. For different processing methods, different cutting amounts are required. The selection principle of cutting amount is: to ensure the machining accuracy and surface roughness of the parts, to fully utilize the cutting performance of the tool, to ensure reasonable tool durability, and to fully utilize the performance of the machine tool to maximize productivity and reduce costs.
1. Determination of spindle speed The spindle speed should be selected according to the permissible cutting speed and the workpiece (or tool) diameter. Its calculation formula is:
n=1000v/Ï€d
In the formula: v—cutting speed in m/min, determined by the durability of the tool; n—spindle speed in r/min; d—workpiece diameter or tool diameter in mm.
The calculated spindle speed n is finally determined by the machine tool's choice of the machine's or nearer speed.
2. Feed speed determination The feed speed is an important parameter in the cutting amount of CNC machine tools. It is mainly selected according to the machining accuracy and surface roughness requirements of the parts and the material properties of the tools and workpieces. The maximum feed rate is limited by the machine stiffness and the performance of the feed system.
The principle for determining the feed rate is:
(1) When the quality requirements of the workpiece can be guaranteed, in order to improve production efficiency, a higher feed rate can be selected. Generally, it is selected in the range of 100 to 200 mm/min.
(2) When cutting or machining deep holes or machining with high speed steel tools, it is advisable to select a lower feed rate, which is generally selected within the range of 20 to 50 mm/min.
(3) When the machining accuracy and surface roughness are required to be high, the feed rate should be selected to be smaller, generally in the range of 20 to 50 mm/min.
(4) When the tool is in the idle stroke, especially when the distance is “return to zeroâ€, the maximum feed rate set by the CNC system of the machine can be set.
The second section of CNC turning machining process and tooling I. CNC machining process analysis (a) machining process division on CNC machine tools processing parts, the process can be more concentrated, one assembly should complete all processes as much as possible. Compared with ordinary machine tool processing, the machining process has its own characteristics. The common process division principles are as follows:
1. Principle of maintaining precision
2. Principle of improving production efficiency
We are professional customized Die Cast Keychain, such as metal alloy keychain, metal keyring, alloy key holder,hollow keychain, animal keychain, gold keychain, silver keychain, blank logo keychain, Keychain Metal, custom alloy keychain, fashion alloy keychain, cute keychain, soft Enamel Keychain, hard enamel keychain, epoxy coating keychain, offset Printing Keychain, etc.
The feature of this kind of keychain usually three-dimensional, so we can made of by zinc alloy material according to to craft unique. And to make the die cast keychain is more beautiful, we can plating color on the surface, such as gold, pearl gold, nickel, pearl nickel, black, rose gold, bronze, copper, antique silver and so on . It is can highlight your logo ,usually we use for souvenir gift ,toursit gift and so on.
Die Cast Keychain
Metal Keychain,Die Cast Keychain,Custom Logo Keychains,Customized Keyring
Shenzhen MingFengXing Art & Craft Products CO., LTD. , https://www.mf-gift.com